Switch - Dell PowerConnect 5524 Initial Setup

This article will guide us on how to quickly setup a Dell switch powerconnect 5524.
0) Factory Reset
First thing, we will erase all configurations from the device.
console# delete startup-config
console# reload
1) Enable Password
First, let's enable password authentication for elevated privileges console access.
console> enable
console# configure
console(config)# enable password level 1 YOUR_PASSWORD
console(config)# enable password level 15 YOUR_PASSWORD
Next time we try to login to the elevated privileges console we will be prompted with a password box.
console> enable
Password:********
01-Oct-2006 16:57:15 %AAA-I-CONNECT: User CLI session for user unKnown over console , source 0.0.0.0 destination  0.0.0.0 ACCEPTED
2) Adding Users
Let's add an administrator user.
console# show users accounts

   UserName    Privilege  Password        Lockout
                          Expiry date
-------------- --------- -------------- -----------
console# configure
console(config)# username admin privilege 15 password YOUR_PASSWORDconsole(config)# do show users accounts
UserName Privilege Password Lockout
Expiry date
-------------- --------- -------------- -----------
admin 15 - -
3) Enabling Console Local User Authentication
We do not want that anyone with a console cable connected to the device are able to issue any command without logging in.
console(config)# aaa authentication login default local
console(config)# line console
console(config-line)# login authentication default
4) Enable HTTP Access
First, we need to change the port we will be connecting our laptop into a routed interface and not a regular switchport.
console(config)# interface gi1/0/1
console(config-if)# no switchport
console(config-if)# 01-Oct-2006 17:08:22 %LINK-W-Down:  Vlan 1
Let's assign an IP address to port gi1/0/1.
console(config)# interface gi1/0/1
console(config-if)# ip address 192.168.10.2 255.255.255.0
console(config-if)# exit
console(config)# do show ip interface


    IP Address         I/F       Type     Directed   Precedence   Status
                                          Broadcast
------------------- --------- ----------- ---------- ---------- -----------
192.168.10.2/24     gi1/0/1   Static      disable    No         Valid
I have connected my laptop to port gi1/0/1 and assigned the IP address 192.168.10.1/24 to it. And, we should be able ping the switch.
tiago@HP-8470 ~> ping 192.168.10.2
PING 192.168.10.2 (192.168.10.2) 56(84) bytes of data.
64 bytes from 192.168.10.2: icmp_seq=1 ttl=64 time=0.908 ms
64 bytes from 192.168.10.2: icmp_seq=2 ttl=64 time=0.924 ms
64 bytes from 192.168.10.2: icmp_seq=3 ttl=64 time=0.961 ms
64 bytes from 192.168.10.2: icmp_seq=4 ttl=64 time=0.962 ms
^C
--- 192.168.10.2 ping statistics ---
4 packets transmitted, 4 received, 0% packet loss, time 3011ms
rtt min/avg/max/mdev = 0.908/0.938/0.962/0.023 ms
By default the HTTP server is enabled and listening on port 80. We can check with the command :
console(config)# do show ip http
HTTP server enabled. Port: 80
Interactive timeout: 10 minutes, 0 seconds.
5) Firmware Upgrade
Check this page to verify if the device is outdated and if a new firmware version is available. Download and extract the firmware file to a folder in your PC.
console> show version

       Unit             SW version         Boot version         HW version
------------------- ------------------- ------------------- -------------------
1 4.1.0.12 1.0.0.14 00.00.02 console# copy running-config startup-config
Overwrite file [startup-config] ?[Yes/press any key for no]....01-Oct-2006 17:41:39 %COPY-I-FILECPY: Files Copy - source URL running-g
01-Oct-2006 17:41:43 %COPY-N-TRAP: The copy operation was completed successfully
Copy succeeded
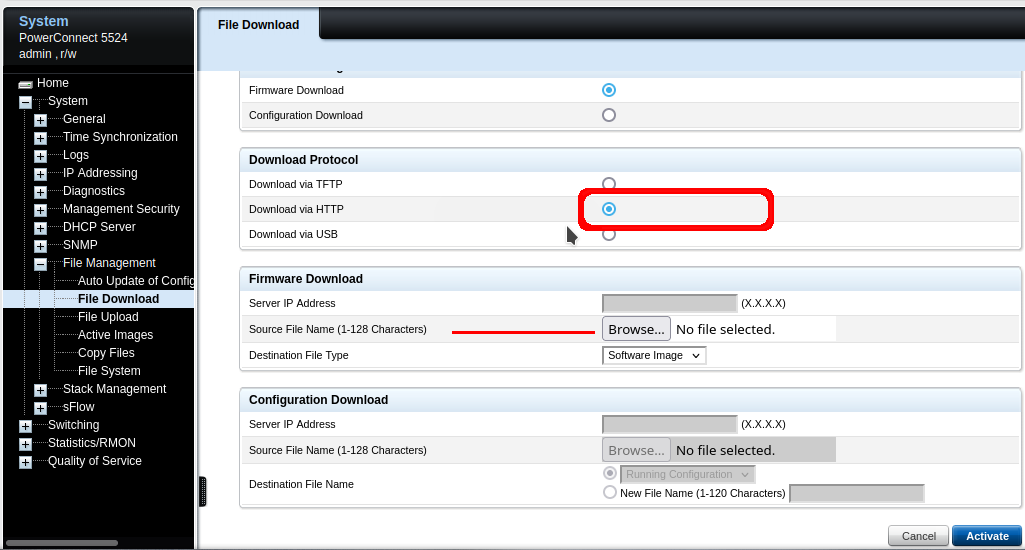
Navigate to System > File Management > File Download
And under Download Protocol select HTTP that will enable the browse button. Therefore allowing the firmware to be uploaded.

Once the upload completes we will see the below :

We now need to navigate to System > File Management > Active Images and select the newly uploaded version and hit the apply button.

Go to the console and reload the device.
console# reloadAfter the reload we can verify the version and confirm that we are running the latest.
console# show version

       Unit             SW version         Boot version         HW version
------------------- ------------------- ------------------- -------------------
         1               4.1.0.24            1.0.0.14            00.00.02
We should repeat the process above with the bootloader that in my case was the same version already running on the device.
The upload of the bootloader only worked after a switch reload.
Conclusion
The steps above are a basic initial set up to have the switch with minimal security and up to date firmware. In future articles, we will delve into more advanced configurations.
![Infoitech - [B]logging](https://blog.infoitech.co.uk/content/images/2021/04/youtube-small-cover-1.png)

