![Infoitech - [B]logging](https://blog.infoitech.co.uk/content/images/2021/04/youtube-small-cover-1.png)
switch - Dell Powerconnect 5524 Hardening Security

Let's harden the security of our switch enabling SSH access only and making sure that the web server runs over HTTPS.
1) Enabling SSH Key Authentication
First, the SSH server has to be enabled.
ip ssh serverconsole(config)# do sh ip ssh
SSH Server enabled. Port: 22
RSA key was generated.
DSA(DSS) key was not generated.
SSH Public Key Authentication is disabled.
Active incoming sessions:
IP address SSH username Version Cipher Auth Code
----------------- -------------- ----------- ----------- --------------
Second, we need to enable only public key authentication.
ip ssh pubkey-authconsole(config)# do sh ip ssh
SSH Server enabled. Port: 22
RSA key was generated.
DSA(DSS) key was not generated.
SSH Public Key Authentication is enabled.
Active incoming sessions:
IP address SSH username Version Cipher Auth Code
----------------- -------------- ----------- ----------- --------------2) Creating SSH Keys
Next we will create an SSH key for the admin user.
ssh-keygen -b 2048 -t rsa -C "Home SW1 - Dell Switch 5524" -N 123456Unfortunately, the maximum bit rate supported is 2048.
We will now copy our public key to our switch.
tiago@desktop ~/D/s/r/s/SSH (main)> ll
total 8.0K
-rw------- 1 tiago tiago 1.9K Nov 8 18:48 private.key
-rw-r--r-- 1 tiago tiago 409 Nov 8 18:22 public.key
tiago@desktop ~/D/s/r/s/SSH (main)> cat public.key
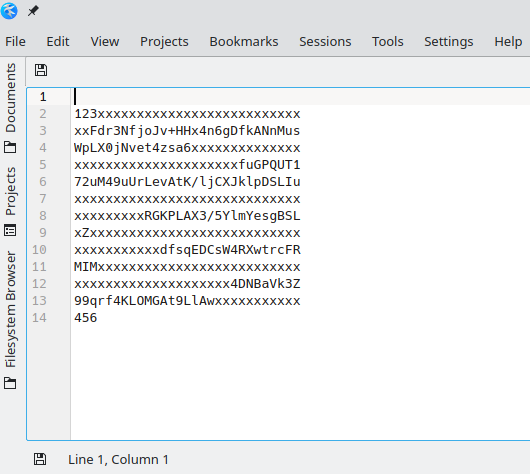
ssh-rsa 123xxxxxxxxxxxxxxxxxxxxxxxxxxxxFdr3NfjoJv+HHx4n6gDfkANnMusWpLX0jNvet4zsa6xxxxxxxxxxxxxxxxxxxxxxxxxxxxxxxxxxxfuGPQUT172uM49uUrLevAtK/ljCXJklpDSLIuxxxxxxxxxxxxxxxxxxxxxxxxxxxxxxxxxxxxxxRGKPLAX3/5YlmYesgBSLxZxxxxxxxxxxxxxxxxxxxxxxxxxxxxxxxxxxxxxxdfsqEDCsW4RXwtrcFRMIMxxxxxxxxxxxxxxxxxxxxxxxxxxxxxxxxxxxxxxxxxxxxxx4DNBaVk3Z99qrf4KLOMGAt9LlAwxxxxxxxxxxx456 Home SW1 - Dell Switch 5524
Copy your key that starts at 123... and ends at 456 to a text editor and divide it in 30 characters lines as seen on the picture below.
3) Copying the Public Key to the Switch
Log into the switch and issue the following commands to add the generated public key to the admin user.
console# configure
console(config-pubkey-chain)# user-key admin rsa
console(config-pubkey-key)# key-string row 123xxxxxxxxxxxxxxxxxxxxxxxxxx
console(config-pubkey-key)# key-string row xxFdr3NfjoJv+HHx4n6gDfkANnMus
console(config-pubkey-key)# key-string row WpLX0jNvet4zsa6xxxxxxxxxxxxxx
console(config-pubkey-key)# key-string row xxxxxxxxxxxxxxxxxxxxxfuGPQUT1
console(config-pubkey-key)# key-string row 72uM49uUrLevAtK/ljCXJklpDSLIu
console(config-pubkey-key)# key-string row xxxxxxxxxxxxxxxxxxxxxxxxxxxxx
console(config-pubkey-key)# key-string row xxxxxxxxxRGKPLAX3/5YlmYesgBSL
console(config-pubkey-key)# key-string row xZxxxxxxxxxxxxxxxxxxxxxxxxxxx
console(config-pubkey-key)# key-string row xxxxxxxxxxxdfsqEDCsW4RXwtrcFR
console(config-pubkey-key)# key-string row MIMxxxxxxxxxxxxxxxxxxxxxxxxxx
console(config-pubkey-key)# key-string row xxxxxxxxxxxxxxxxxxxx4DNBaVk3Z
console(config-pubkey-key)# key-string row 99qrf4KLOMGAt9LlAwxxxxxxxxxxx
console(config-pubkey-key)# key-string row 456
console(config-pubkey-key)# exit
We can use the command below to confirm that the key above was added correctly.
sh crypto key pubkey-chain ssh username adminUsername: admin
rsa key data:
ssh-rsa 123xxxxxxxxxxxxxxxxxxxxxxxxxx
xxFdr3NfjoJv+HHx4n6gDfkANnMus
WpLX0jNvet4zsa6xxxxxxxxxxxxxx
xxxxxxxxxxxxxxxxxxxxxfuGPQUT1
72uM49uUrLevAtK/ljCXJklpDSLIu
xxxxxxxxxxxxxxxxxxxxxxxxxxxxx
xxxxxxxxxRGKPLAX3/5YlmYesgBSL
xZxxxxxxxxxxxxxxxxxxxxxxxxxxx
xxxxxxxxxxxdfsqEDCsW4RXwtrcFR
MIMxxxxxxxxxxxxxxxxxxxxxxxxxx
xxxxxxxxxxxxxxxxxxxx4DNBaVk3Z
99qrf4KLOMGAt9LlAwxxxxxxxxxxx
456
Fingerprint: 43:43:43:43:43:43:43:43:43:43:43:43:43:4f:43:434) Establishing an SSH Connection
Unfortunately, the cryptographic algorithm used by the powerconnect 5524 is old and weak which makes essential to have different levels of security like a heavily firewalled subnet where the management IP resides.
Also, because of the legacy cryptographic algorithm we need to explicitly tell to our client to use them as seen on my ssh configuration file below.
Host home-sw1
        Hostname        192.168.4.2
        User            admin
        IdentityFile    /home/tiago/Documents/servers/routers/sw1-home-uk/SSH/privnew2048.key
KexAlgorithms diffie-hellman-group-exchange-sha1,diffie-hellman-group1-sha1tiago@desktop ~/D/s/r/s/SSH (main)> sudo ssh home-sw1
Enter passphrase for key '/home/tiago/Documents/servers/routers/sw1-home-uk/SSH/private.key':
User Name:admin
Password:********
console#You still need to input a valid username and password even with SSH key authentication. Dell thinks SSH as another layer of security.
5) Disabling Telnet
With SSH enabled we do not need telnet enabled and it can be disabled with the command below :
no ip telnet server6) Adjusting the Clock
Make sure that the clock is set correctly otherwise your certificates will have the wrong date and time when set in the next step.
I am going to use my firewall as the NTP server for the switch.
sntp server 192.168.4.1 pollsntp unicast client enablesntp client poll timer 300sntp unicast client polldo show sntp statusClock is synchronized, stratum 2, reference is 192.168.4.1, unicast
Reference time is e534efc1.ae4cc641 13:01:53.0 UTC Nov 9 2021
Unicast servers:
Server Status Last Response Offset Delay
[mSec] [mSec]
--------------- --------- ------------------- --------- -------
192.168.4.1 up 13:01:53.0 UTC Nov 475467005 0
9 2021 661
Anycast server:
Server Interface Status Last Response Offset Delay
[mSec] [mSec]
--------------- --------- --------- ----------------------- --------- -------
Broadcast:
Interface IP address Last Response
------------ --------------- -----------------------console(config)# do show clock detail
13:02:06 UTC Nov 9 2021
Time source is sntp
Time zone:
Offset is UTC+07) Enabling HTTPS
First, we need to disable the HTTP server with the command below.
no ip http serverconsole(config)# do sh ip http
HTTP server disabled. Port: 80
Interactive timeout: 10 minutes, 0 seconds.And then, enable the HTTPS server.
ip http secure-serverconsole(config)# 16-Oct-2006 09:56:21 %HTTP_HTTPS-W-NOHOSTKEY: HTTPS service has been enabled but an encryption key (certificate 1) was not found.
For key generation use the 'crypto key generate' commands. The service will start automatically when a host key is generated.Let's generate a self-signed certificate as instructed above. It is possible to import a certificate signed from an CA like let's encrypt, but it will involve automation to renew the certificate every three months and automatically import it to the switch. This will be tackled in a future article, so stay tuned.
crypto certificate 1 generate key-generate 2048 cn sw1.infoitech.co.uk or infoitech ou HQ loc London st Surbiton cu UKconsole(config)# do sh ip https
HTTPS server enabled. Port: 443
Certificate 1 is active.
Issued by : C=UK, ST=Surbiton, L=London, CN=sw1.infoitech.co.uk, O=infoitech, OU=HQ
Valid From: Nov 9 13:09:20 2021 GMT
Valid to: Nov 9 13:09:20 2022 GMT
Subject: C=UK, ST=Surbiton, L=London, CN=sw1.infoitech.co.uk, O=infoitech, OU=HQ
SHA1 Fingerprint: xxxxxxxx xxxxxxxx xxxxxxxx xxxxxxxx xxxxxxxx
Certificate 2 does not exist.
Interactive secure server timeout: 10 minutes, 0 seconds.We are now able to access the switch webserver.
8) Removing Ports from VLAN1
It is recommended to not have ports in VLAN1 due to well known abuses against VLAN1. Since we cannot delete VLAN1 we will move all ports not in use to a "black-hole" VLAN. The Dell 5524 manual says the following :
According to standard and industry practice we should use VLAN4095 as our "black-hole". A frame classified to this VLAN is silently dropped.
However, I could not find a way to set a port to be in VLAN4095, instead there is the option to set the port as access and VLAN to none. Let's configure all ports not in use as follows :
console(config)# do sh vlan

Vlan     Name        Tagged Ports      UnTagged Ports     Type    Authorization
---- ------------ ------------------ ------------------ --------- -------------
 1        1                          gi1/0/8-23,         Default    Required
                                     gi1/0/25-48,
                                     te1/0/1-2,
                                     gi2/0/1-48,
                                     te2/0/1-2,
                                     gi3/0/1-48,
                                     te3/0/1-2,
                                     gi4/0/1-48,
                                     te4/0/1-2,
                                     gi5/0/1-48,
                                     te5/0/1-2,
                                     gi6/0/1-48,
                                     te6/0/1-2,
                                     gi7/0/1-48,
                                     te7/0/1-2,
                                     gi8/0/1-48,
                                     te8/0/1-2,Po1-32
 4       MGMT     gi1/0/1,gi1/0/6-7                     permanent   Required
 6       DNS          gi1/0/1-2                         permanent   Required
 10    SERVERS        gi1/0/1-2                         permanent   Required
 20    PRIVATE         gi1/0/1            gi1/0/3       permanent   Required
 30  ENTERTAINMEN gi1/0/1,gi1/0/4-5                     permanent   Required
     T
interface range gi1/0/8-23,gi2/0/1-48,gi3/0/1-48,gi4/0/1-48,gi5/0/1-48,gi6/0/1-48,gi7/0/1-48,te1/0/1-2,te2/0/1-2,te3/0/1-2,te4/0/1-2,te5/0/1-2,te6/0/1-2,te7/0/1-2,te8/0/1-2,po1-32Configuring all ports may consume an excessive amount of time. Define only the required ports to save time.
Do you wish to continue? (Y/N)[N] Yswitchport mode access
switchport access vlan noneconsole# show vlan
Vlan Name Tagged Ports UnTagged Ports Type Authorization
---- ------------ ------------------ ------------------ --------- -------------
1 1 Default Required
4 MGMT gi1/0/1,gi1/0/6-7 permanent Required
6 DNS gi1/0/1-2 permanent Required
10 SERVERS gi1/0/1-2 permanent Required
20 PRIVATE gi1/0/1 gi1/0/3 permanent Required
30 ENTERTAINMEN gi1/0/1,gi1/0/4-5 permanent Required
T
40 FLATMATE gi1/0/1,gi1/0/4 permanent Required
50 GUEST gi1/0/1,gi1/0/4 permanent RequiredAnd finally, let's administratively shutdown the unsed ports.
console# show interfaces configuration
                                               Flow    Admin     Back   Mdix
Port     Type         Duplex  Speed  Neg      control  State   Pressure Mode
-------- ------------ ------  -----  -------- -------  -----   -------- ----
gi1/0/1  1G-Copper    Full    1000   Enabled  On       Up      Disabled Auto
gi1/0/2  1G-Copper    Full    1000   Enabled  On       Up      Disabled Auto
gi1/0/3  1G-Copper    Full    1000   Enabled  On       Up      Disabled Auto
gi1/0/4  1G-Copper    Full    1000   Enabled  On       Up      Disabled Auto
gi1/0/5  1G-Copper    Full    1000   Enabled  On       Up      Disabled Auto
gi1/0/6  1G-Copper    Full    1000   Enabled  On       Up      Disabled Auto
gi1/0/7  1G-Copper    Full    1000   Enabled  On       Up      Disabled Auto
gi1/0/8  1G-Copper    Full    1000   Enabled  On       Up      Disabled Auto
gi1/0/9  1G-Copper    Full    1000   Enabled  On       Up      Disabled Auto
gi1/0/10 1G-Copper    Full    1000   Enabled  On       Up      Disabled Auto
gi1/0/11 1G-Copper    Full    1000   Enabled  On       Up      Disabled Auto
gi1/0/12 1G-Copper    Full    1000   Enabled  On       Up      Disabled Auto
gi1/0/13 1G-Copper    Full    1000   Enabled  On       Up      Disabled Auto
gi1/0/14 1G-Copper    Full    1000   Enabled  On       Up      Disabled Auto
gi1/0/15 1G-Copper    Full    1000   Enabled  On       Up      Disabled Auto
gi1/0/16 1G-Copper    Full    1000   Enabled  On       Up      Disabled Auto
gi1/0/17 1G-Copper    Full    1000   Enabled  On       Up      Disabled Auto
gi1/0/18 1G-Copper    Full    1000   Enabled  On       Up      Disabled Auto
gi1/0/19 1G-Copper    Full    1000   Enabled  On       Up      Disabled Auto
gi1/0/20 1G-Copper    Full    1000   Enabled  On       Up      Disabled Auto
gi1/0/21 1G-Copper    Full    1000   Enabled  On       Up      Disabled Auto
gi1/0/22 1G-Copper    Full    1000   Enabled  On       Up      Disabled Auto
gi1/0/23 1G-Copper    Full    1000   Enabled  On       Up      Disabled Auto
gi1/0/24 1G-Copper    Full    1000   Enabled  On       Down    Disabled Auto
te1/0/1  10G-Fiber    Full    10000  Disabled On       Up      Disabled Off
te1/0/2  10G-Fiber    Full    10000  Disabled On       Up      Disabled Off
interface range gi1/0/8-24,te1/0/1-2
shutdownconsole# show interfaces configuration
Flow Admin Back Mdix
Port Type Duplex Speed Neg control State Pressure Mode
-------- ------------ ------ ----- -------- ------- ----- -------- ----
gi1/0/1 1G-Copper Full 1000 Enabled On Up Disabled Auto
gi1/0/2 1G-Copper Full 1000 Enabled On Up Disabled Auto
gi1/0/3 1G-Copper Full 1000 Enabled On Up Disabled Auto
gi1/0/4 1G-Copper Full 1000 Enabled On Up Disabled Auto
gi1/0/5 1G-Copper Full 1000 Enabled On Up Disabled Auto
gi1/0/6 1G-Copper Full 1000 Enabled On Up Disabled Auto
gi1/0/7 1G-Copper Full 1000 Enabled On Up Disabled Auto
gi1/0/8 1G-Copper Full 1000 Enabled On Down Disabled Auto
gi1/0/9 1G-Copper Full 1000 Enabled On Down Disabled Auto
gi1/0/10 1G-Copper Full 1000 Enabled On Down Disabled Auto
gi1/0/11 1G-Copper Full 1000 Enabled On Down Disabled Auto
gi1/0/12 1G-Copper Full 1000 Enabled On Down Disabled Auto
gi1/0/13 1G-Copper Full 1000 Enabled On Down Disabled Auto
gi1/0/14 1G-Copper Full 1000 Enabled On Down Disabled Auto
gi1/0/15 1G-Copper Full 1000 Enabled On Down Disabled Auto
gi1/0/16 1G-Copper Full 1000 Enabled On Down Disabled Auto
gi1/0/17 1G-Copper Full 1000 Enabled On Down Disabled Auto
gi1/0/18 1G-Copper Full 1000 Enabled On Down Disabled Auto
gi1/0/19 1G-Copper Full 1000 Enabled On Down Disabled Auto
gi1/0/20 1G-Copper Full 1000 Enabled On Down Disabled Auto
gi1/0/21 1G-Copper Full 1000 Enabled On Down Disabled Auto
gi1/0/22 1G-Copper Full 1000 Enabled On Down Disabled Auto
gi1/0/23 1G-Copper Full 1000 Enabled On Down Disabled Auto
gi1/0/24 1G-Copper Full 1000 Enabled On Down Disabled Auto
te1/0/1 10G-Fiber Full 10000 Disabled On Down Disabled Off
te1/0/2 10G-Fiber Full 10000 Disabled On Down Disabled Off Conclusion
The steps above guided us through a basic security hardening of our switch. Also make sure to setup strong passwords and manage the users properly. It is vital to also have the switch in a heavily firewalled subnet as mentioned previously in the article.
Resources
 SEEI
SEEI
Dell Power Connect 5500 User's Guide Manual
Dell Power Connect 5500 CLI Manual