ZFS - Tuning
I am focused on refactoring and monitoring my storage over my home and cloud. The goal is to move all my storage over to ZFS to standardize and benefit from ZFS' features. In an previous article, I have used RAID 0 with a single disk to present the disks to the OS, however, the ZFS documentation recommends using JBOD instead of any type of RAID when presenting the disks to ZFS. With that in mind, this article will describe how to set up a JBOD in a MegaRAID card using the megaCLI tool, create a ZFS pool and add it to proxmox.
Introduction
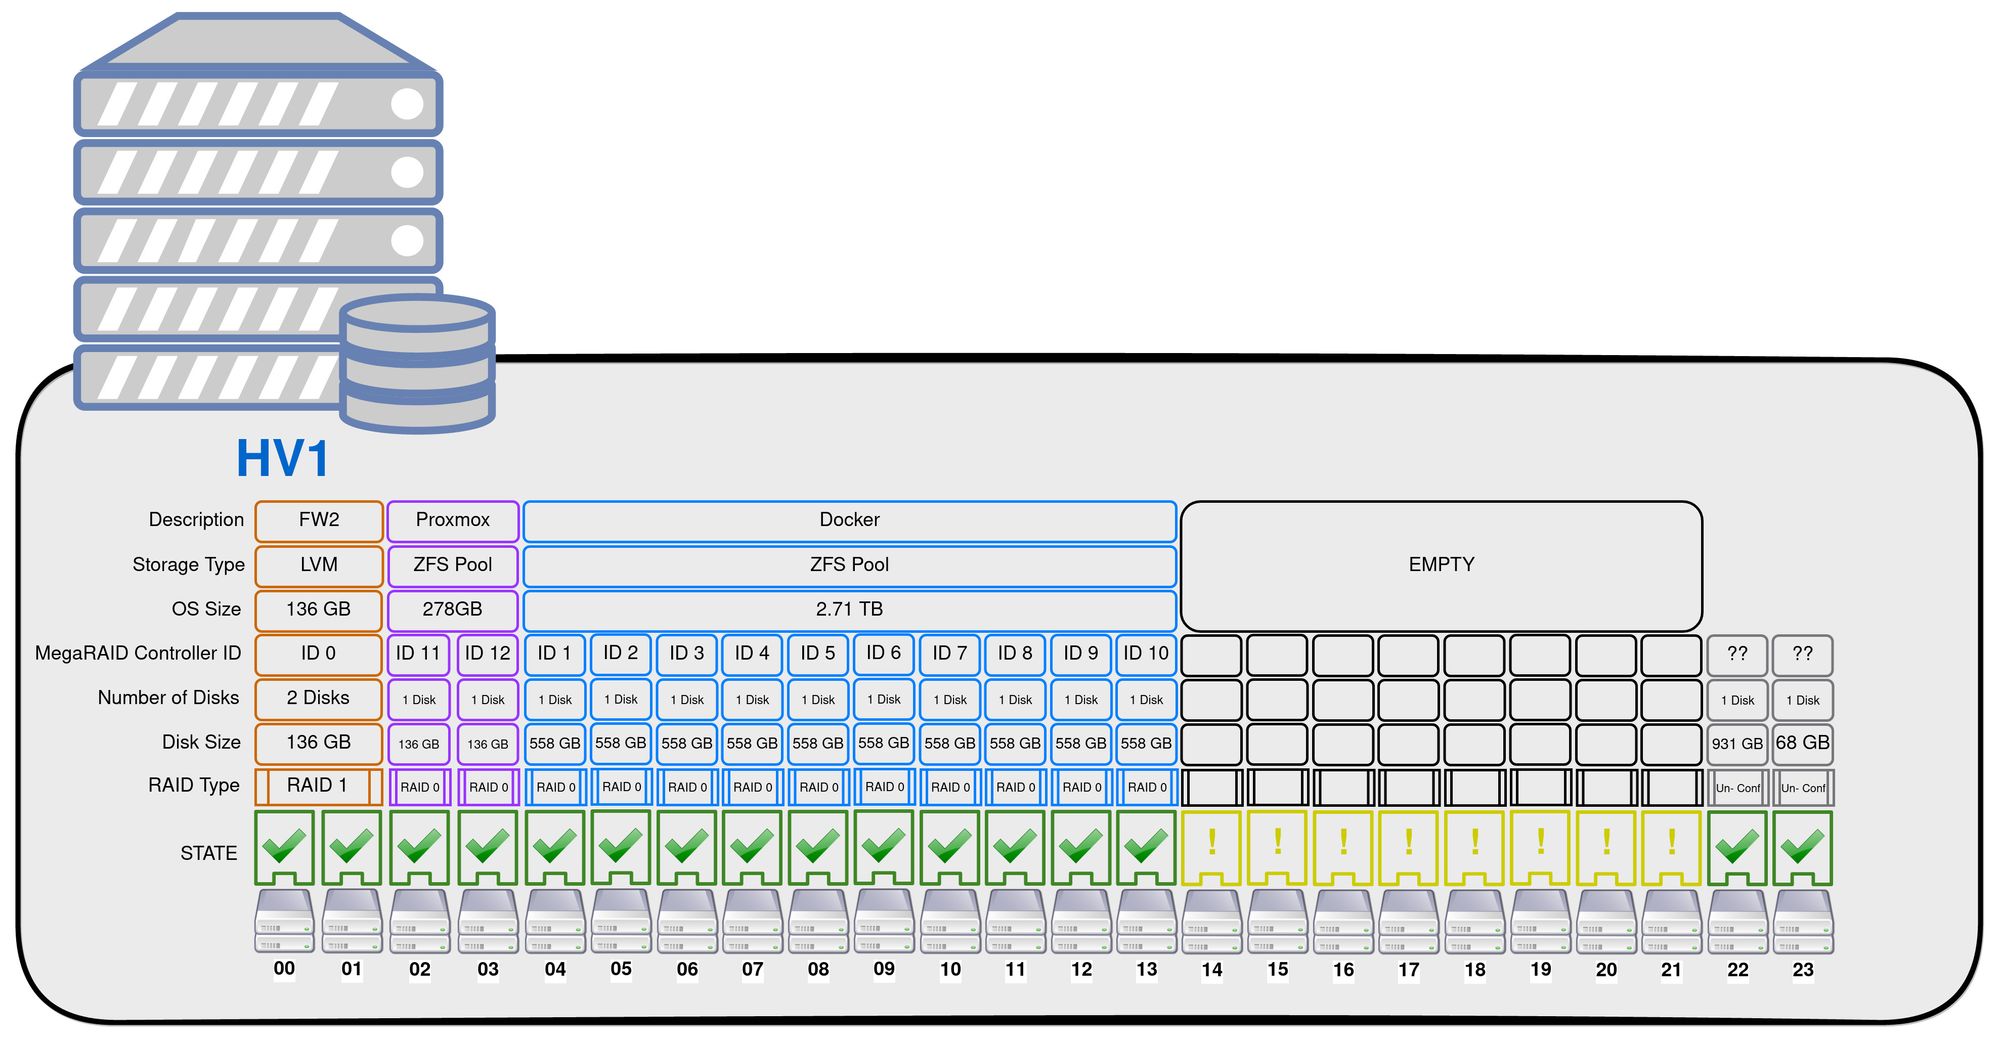
Before starting to issue commands, we need to understand what is our end goal. The picture below describes the current disk configuration for one of my hypervisors. As seen, it is using the not recommended RAID 0 configuration.

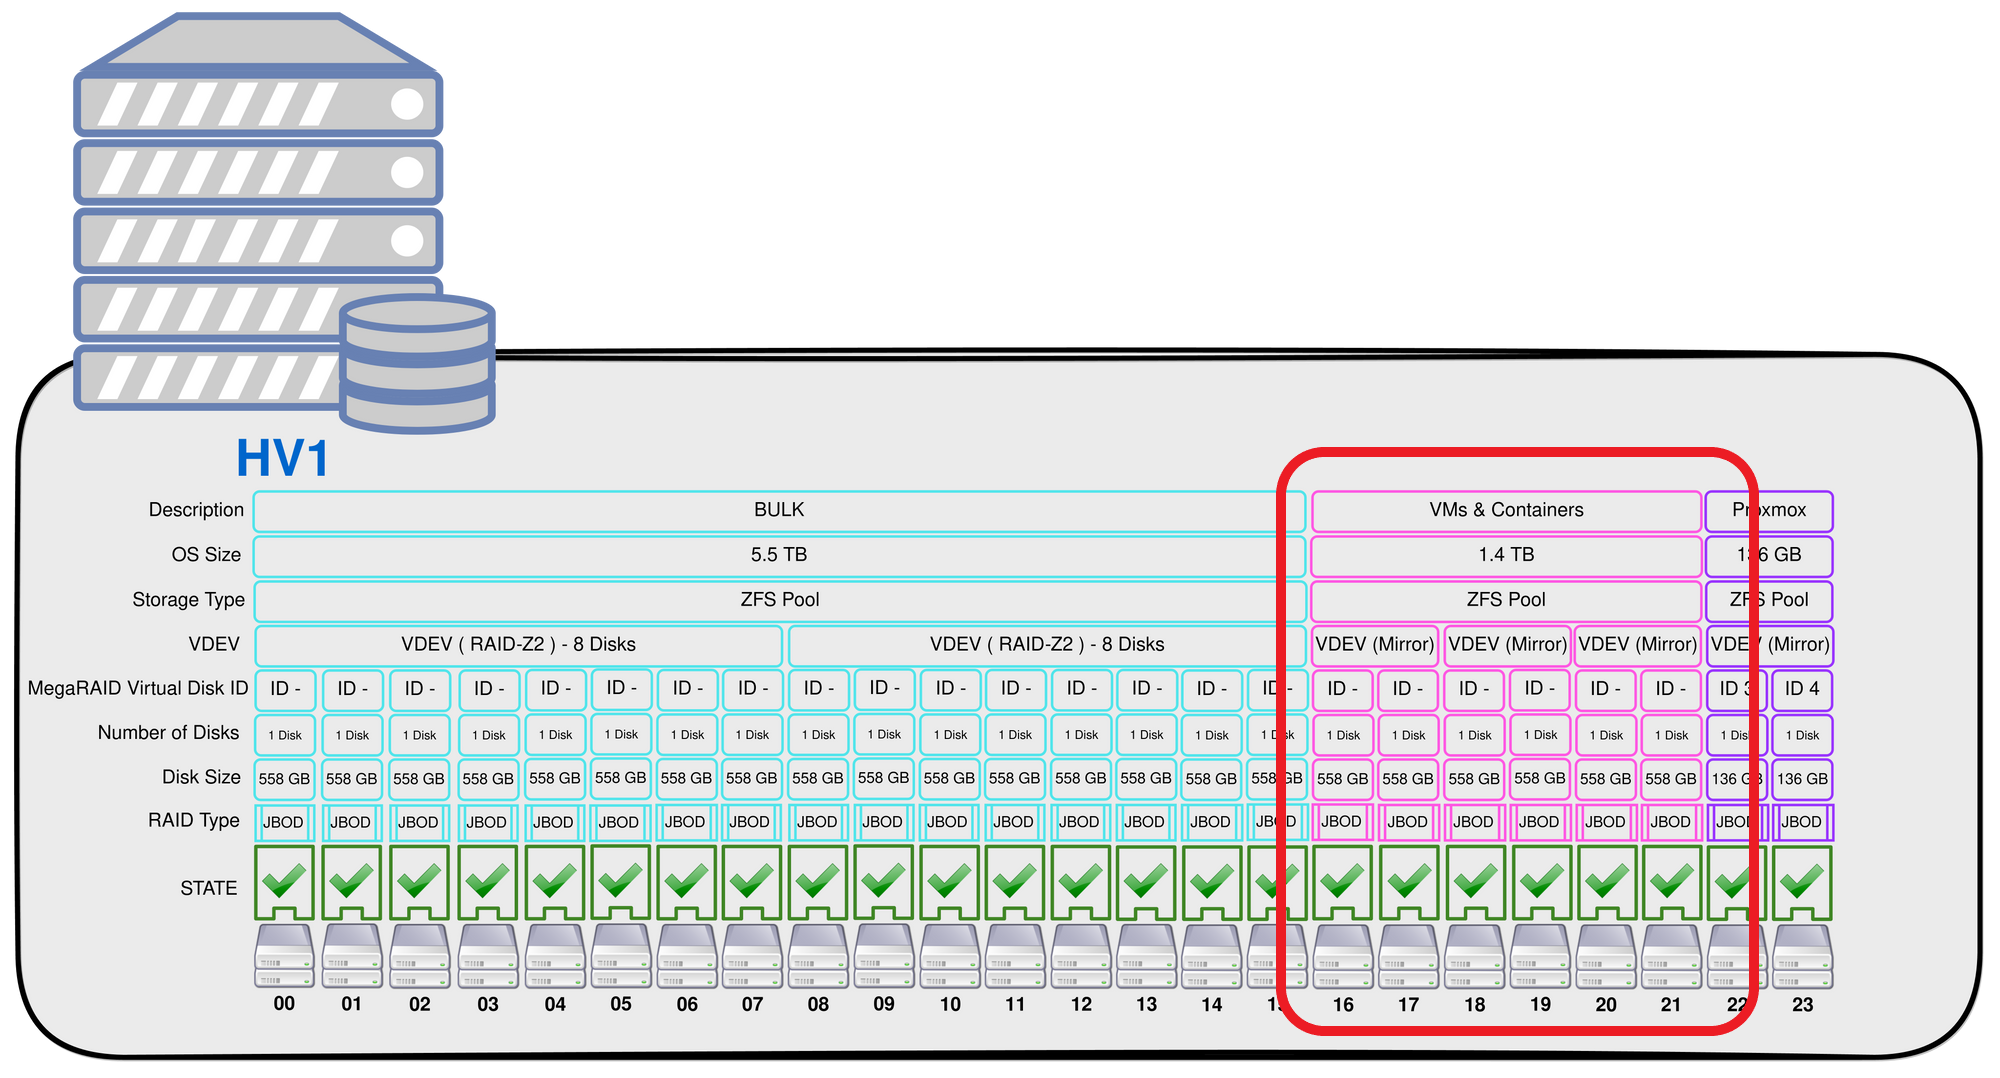
After all migrations, the storage will look like the representation in the diagram below. However, the hypervisor is live and we can not just scrap everything and rebuild the whole storage. It will have to be done in stages and the first step will be the creation of the VMs and Containers pool.

1) Creating a JBOD
We will implement the first step in the creation of our pool and this time following the recommendations creating a JBOD with the 6 newly installed disks.
Let's check if our megaRAID adapter supports JBOD and if yes let's enable it.
The megaCLI command help has two options for JBOD, one is to enable JBOD and the other to set disks as JBOD.
root@hv1:~/storage/megacli# megacli help | grep -i jbod
MegaCli -AdpSetProp -EnableJBOD -val -aN|-a0,1,2|-aALL
       val - 0=Disable JBOD mode.
             1=Enable JBOD mode.
    | CopyBackDsbl | LoadBalanceMode | UseFDEOnlyEncrypt | WBSupport | EnableJBOD
MegaCli -PDMakeJBOD -PhysDrv[E0:S0,E1:S1,...] -aN|-a0,1,2|-aALLWe can also use the AdpGetProp command to check the current state of the property.
root@hv1:~/storage/megacli# megacli AdpGetProp enablejbod -a0

Adapter 0: JBOD: Disabled

Exit Code: 0x00Our adapter has the JBOD option disabled.
Let's enable and consequently check its state with the commands below
root@hv1:~/storage/megacli# megacli AdpSetProp EnableJBOD 1 -a0It takes some time to complete.
root@hv1:~/storage/megacli# megacli AdpGetProp enablejbod -aALL

Adapter 0: JBOD: Enabled

Exit Code: 0x00
2) Make JBOD
In theory now we should use the command to make disks JBOD. However the 6 new installed disks were automatically converted to JBOD after the option has been enabled on the adapter.
Slot Number: 0 - Online, Spun Up
Slot Number: 1 - Online, Spun Up
Slot Number: 2 - Online, Spun Up
Slot Number: 3 - Online, Spun Up
Slot Number: 4 - Online, Spun Up
Slot Number: 5 - Online, Spun Up
Slot Number: 6 - Online, Spun Up
Slot Number: 7 - Online, Spun Up
Slot Number: 8 - Online, Spun Up
Slot Number: 9 - Online, Spun Up
Slot Number: 10 - Online, Spun Up
Slot Number: 11 - Online, Spun Up
Slot Number: 12 - Online, Spun Up
Slot Number: 13 - Online, Spun Up
Slot Number: 16 - JBOD
Slot Number: 17 - JBOD
Slot Number: 18 - JBOD
Slot Number: 19 - JBOD
Slot Number: 20 - JBOD
Slot Number: 21 - JBOD
Slot Number: 22 - Online, Spun Up
Slot Number: 23 - Online, Spun Up
The disks also are being seen by the OS and we are ready to create our ZFS pool.
sdf                                8:80   0 558.9G  0 disk
sdg                                8:96   0 558.9G  0 disk
sdh                                8:112  0 558.9G  0 disk
sdi                                8:128  0 558.9G  0 disk
sdj                                8:144  0 558.9G  0 disk
sdk                                8:160  0 558.9G  0 disk
3) ZFS Tuning
ZFS is a fast and reliable storage solution, however it has to be handled and configured properly in order to deliver its speed and reliability.
After reading a few ZFS tuning articles ( you can find the links to all of them at the bottom of this article ) I came up with the following configuration for the VM & Containers pool.
ashift = 9 - to match the 512B sectors of the underlying disks.
compresssion = LZ4 - ZFS compression is very fast and rarely will affect performance.
recordsize = 16K - Recommended for fast IOPs on pools that will deal with random reads and writes like VM disks.
volblocksize = 4K - Another recomendation from the documentation for VM disks.
geometry - The pool will contain 6x Disks in total, divided into 3x mirrored VDEVs.

4) Creating the Pool
We need to first create the pool and set its ashift.
zpool create -f -o ashift=9 vm-storage-pool mirror /dev/sdk /dev/sdj mirror /dev/sdi /dev/sdh mirror /dev/sdg /dev/sdfzpool statuspool: vm-storage-pool
state: ONLINE
scan: none requested
config:
NAME STATE READ WRITE CKSUM
vm-storage-pool ONLINE 0 0 0
mirror-0 ONLINE 0 0 0
sdk ONLINE 0 0 0
sdj ONLINE 0 0 0
mirror-1 ONLINE 0 0 0
sdi ONLINE 0 0 0
sdh ONLINE 0 0 0
mirror-2 ONLINE 0 0 0
sdg ONLINE 0 0 0
sdf ONLINE 0 0 0
errors: No known data errors5) Setting ZFS Properties
After creating the pool we need to set a few more options that are not setable during creation.
zfs set compression=lz4 vm-storage-poolroot@hv1:~/storage/megacli# zfs get compression vm-storage-pool
NAME PROPERTY VALUE SOURCE
vm-storage-pool compression lz4 localzfs set recordsize=16K vm-storage-poolroot@hv1:~/storage/megacli# zfs get recordsize vm-storage-pool
NAME PROPERTY VALUE SOURCE
vm-storage-pool recordsize 16K local6) Adding to Promox
Go to Datacenter > Storage > Add > ZFS.

I have moved a couple of VMs to the pool and all is working as expected.

7) Conclusion
With the steps above we were able to create a ZFS pool for our VM & containers. I higly recommend that you read the workload tuning article from the ZFS docs in order to tune the settings according to your application needs. The geometry is also quite important and this article is recommended for reference as well.
Resources


![Infoitech - [B]logging](https://blog.infoitech.co.uk/content/images/2021/04/youtube-small-cover-1.png)

