![Infoitech - [B]logging](https://blog.infoitech.co.uk/content/images/2021/04/youtube-small-cover-1.png)
Proxmox Cluster (Tucana Cloud) - ZFS Pool - Part IV
This article documents the beginning of my journey moving from data stored into singles disks to proper redundancy and backup.
Every journey has a beginning and for me, it all started when a disk with (hopefully) not so much important data failed pretty much beyond recovery.
With a couple of RAID cards available, I have decided to sit all my data on top of RAID arrays.
We should be careful here because RAID arrays are not backup, we should take it with a grain of salt and always follow the saying that "RAID is not backup! If you do not have a minimum of 3 backups. You do not have a backup!"
I have now my data spread around as follows :
- 5.5TB in a RAID6 with 8 x 1TB disks on a home server.
- 4.8TB in a RAID6 with 10 x 600GB disks on my hypervisor 1 (HV1) colocated into a rack.
- 4.8TB in a RAID6 with 10 x 600GB disks on my hypervisor 2 (HV2) colocated into a rack.
I am recently building another desktop and the current one with my 5.5TB will become a server. As my infrastructure is growing, it changed my focus into storage and the question hammering my mind is :
What's the best storage strategy moving forward ?
My storage currently is not uniform, non-scalable and I need to move into something :
- Manageable - a format that allows easy monitoring.
- Scalable - something that is easy to change in the future.
- Efficient - a setup that provides efficiency for different use cases.
- Redundant - protection to the data stored.
After some research, it seems that the answer to the question above is: ZFS.
What is ZFS ?
According to iXsystems ZFS is :
OpenZFS (ZFS) file system, handles both disk and volume management. ZFS offers RAID options mirror, stripe, and its own parity distribution called RAIDZ that functions like RAID5 on hardware RAID. The file system is extremely flexible and secure, with various drive combinations, checksums, snapshots, and replications all possible. For a deeper dive on ZFS technology, read the ZFS Primer section of the FreeNAS documentation.
Since the goal of this article is not to explain the technologies in detail but present an overview of my setup I will reference all material used in the research for this article in the end.
Let's create a real setup and make some tests with a ZFS storage system.
We will start listing our disks :
root@hv2:~/storage/megacli# megacli -pdlist -aALL | grep -i 'slot\|raw'
Slot Number: 0
Raw Size: 136.732 GB [0x11177330 Sectors]
Slot Number: 1
Raw Size: 136.732 GB [0x11177330 Sectors]
Slot Number: 2
Raw Size: 279.396 GB [0x22ecb25c Sectors]
Slot Number: 3
Raw Size: 279.396 GB [0x22ecb25c Sectors]
Slot Number: 4
Raw Size: 558.911 GB [0x45dd2fb0 Sectors]
Slot Number: 5
Raw Size: 558.911 GB [0x45dd2fb0 Sectors]
Slot Number: 6
Raw Size: 558.911 GB [0x45dd2fb0 Sectors]
Slot Number: 7
Raw Size: 558.911 GB [0x45dd2fb0 Sectors]
Slot Number: 8
Raw Size: 558.911 GB [0x45dd2fb0 Sectors]
Slot Number: 9
Raw Size: 558.911 GB [0x45dd2fb0 Sectors]
Slot Number: 10
Raw Size: 558.911 GB [0x45dd2fb0 Sectors]
Slot Number: 11
Raw Size: 558.911 GB [0x45dd2fb0 Sectors]
Slot Number: 12
Raw Size: 558.792 GB [0x45d964b8 Sectors]
Slot Number: 13
Raw Size: 558.911 GB [0x45dd2fb0 Sectors]
Slot Number: 20
Raw Size: 931.512 GB [0x74706db0 Sectors]
Slot Number: 21
Raw Size: 68.366 GB [0x88bb992 Sectors]
The disks that will be used in our ZFS pool are the 558GB ones. They are in slots from 4 to 13.
ATTENTION - Use JBOD instead of RAID 0 to avoid read-modify-write overhead. Further explanation can be found here and here.
The script below will create the single disk RAID 0 needed :
root@hv2:~/storage/megacli# cat create-raid-0.sh
#!/bin/bash

# This script creates a RAID 0 with the disks passed as arguments.
# Arguments order :
# 1) enclosure ID. Ex) 17
#   1.b) Run megacli -LdPdInfo -aALL -NoLog | grep -i enclosure
#        to confirm the enclosure ID that usually is only one.
#        Make sure to get this number right and avoid data loss.
# 2) Disks range or single disk slot number. Ex) 1 2-10
# Usage Example:
# ./create-raid-0.sh 17 22 2-10
# The command above create a single disk RAID0 array with disk 22 and all the disks in the range 2 to 10
#
#
# The script has minor checks for errors, so USE WITH CAUTION.


#### >> The script currently works just with a single range << ###
### Example : ./create-raid-0 17 10 14
# first : enclosure ID
# second argument : is the start of the range used to create the RAID0 arrays.
# third argument : is the end of the range.
#
# The above creates a single disk RAID0 for each disk from slot 10 to 14.


# Full path to the MegaRaid CLI binary
MEGACLI="/opt/MegaRAID/MegaCli/MegaCli64"

ENCLOSURE_ID=$1
RANGE_START=$2
RANGE_END=$3

##################### Range Validation ################################
## -gt = greater
#if [ $RANGE_START -gt $RANGE_END ]
#then
#       echo '[
#       {"errors":[
#                       "Invalid Range. Start of range is greater than end.",
#               ]
#       }]'
#       exit 1
#fi
#######################################################################


while [ $RANGE_START -le $RANGE_END ]
do
        #echo "megacli -cfgldadd -r0[${ENCLOSURE_ID}:${RANGE_START}] WB RA Cached CachedBadBBU -strpsz512 -a0 -NoLog"

        # Create RAID0 with a single disk.
        /opt/MegaRAID/MegaCli/MegaCli64 -cfgldadd -r0[${ENCLOSURE_ID}:${RANGE_START}] WB RA Cached CachedBadBBU -strpsz512 -a0 -NoLog
        ((RANGE_START=$RANGE_START+1))
done
If you don't use the script is possible to create the arrays manually replacing 17:4 ( Enclosure ID : Disk Slot Number ) in a way that to reflects your environment with the command below:
/opt/MegaRAID/MegaCli/MegaCli64 -cfgldadd -r0[17:4}] WB RA Cached CachedBadBBU -strpsz512 -a0 -NoLogIt will take some minutes for the command to complete. Just wait until you are on the shell again.
root@hv2:~/storage/megacli# ./create-raid-0.sh 17 4 13

Adapter 0: Created VD 1

Adapter 0: Configured the Adapter!!

Exit Code: 0x00

Adapter 0: Created VD 2

Adapter 0: Configured the Adapter!!

Exit Code: 0x00

Adapter 0: Created VD 3

Adapter 0: Configured the Adapter!!

Exit Code: 0x00

Adapter 0: Created VD 4

Adapter 0: Configured the Adapter!!

Exit Code: 0x00

Adapter 0: Created VD 5

Adapter 0: Configured the Adapter!!

Exit Code: 0x00

Adapter 0: Created VD 6

Adapter 0: Configured the Adapter!!

Exit Code: 0x00

Adapter 0: Created VD 7

Adapter 0: Configured the Adapter!!

Exit Code: 0x00

Adapter 0: Created VD 8

Adapter 0: Configured the Adapter!!

Exit Code: 0x00

Adapter 0: Created VD 9

Adapter 0: Configured the Adapter!!

Exit Code: 0x00

Adapter 0: Created VD 10

Adapter 0: Configured the Adapter!!

Exit Code: 0x00
We can now use our jsonify script to inspect the virtual disks :
root@hv2:~/storage/megacli# ./jsonify.sh | jq '.[]'
{
  "id": "0",
  "raid-type": "  Primary-1, Secondary-0, RAID Level Qualifier-0 ",
  "size": "  136.218 GB ",
  "state": "  Optimal ",
  "number-drives": "  2 ",
  "physical-disks": [
    {
      "enclosure-id": "  17 ",
      "slot": "  0 ",
      "disk-size": "  136.732 GB [0x11177330 Sectors] ",
      "disk-state": "  Online, Spun Up "
    },
    {
      "enclosure-id": "  17 ",
      "slot": "  1 ",
      "disk-size": "  136.732 GB [0x11177330 Sectors] ",
      "disk-state": "  Online, Spun Up "
    }
  ]
}
{
  "id": "1",
  "raid-type": "  Primary-0, Secondary-0, RAID Level Qualifier-0 ",
  "size": "  558.406 GB ",
  "state": "  Optimal ",
  "number-drives": "  1 ",
  "physical-disks": [
    {
      "enclosure-id": "  17 ",
      "slot": "  4 ",
      "disk-size": "  558.911 GB [0x45dd2fb0 Sectors] ",
      "disk-state": "  Online, Spun Up "
    }
  ]
}
{
  "id": "2",
  "raid-type": "  Primary-0, Secondary-0, RAID Level Qualifier-0 ",
  "size": "  558.406 GB ",
  "state": "  Optimal ",
  "number-drives": "  1 ",
  "physical-disks": [
    {
      "enclosure-id": "  17 ",
      "slot": "  5 ",
      "disk-size": "  558.911 GB [0x45dd2fb0 Sectors] ",
      "disk-state": "  Online, Spun Up "
    }
  ]
}
{
  "id": "3",
  "raid-type": "  Primary-0, Secondary-0, RAID Level Qualifier-0 ",
  "size": "  558.406 GB ",
  "state": "  Optimal ",
  "number-drives": "  1 ",
  "physical-disks": [
    {
      "enclosure-id": "  17 ",
      "slot": "  6 ",
      "disk-size": "  558.911 GB [0x45dd2fb0 Sectors] ",
      "disk-state": "  Online, Spun Up "
    }
  ]
}
{
  "id": "4",
  "raid-type": "  Primary-0, Secondary-0, RAID Level Qualifier-0 ",
  "size": "  558.406 GB ",
  "state": "  Optimal ",
  "number-drives": "  1 ",
  "physical-disks": [
    {
      "enclosure-id": "  17 ",
      "slot": "  7 ",
      "disk-size": "  558.911 GB [0x45dd2fb0 Sectors] ",
      "disk-state": "  Online, Spun Up "
    }
  ]
}
{
  "id": "5",
  "raid-type": "  Primary-0, Secondary-0, RAID Level Qualifier-0 ",
  "size": "  558.406 GB ",
  "state": "  Optimal ",
  "number-drives": "  1 ",
  "physical-disks": [
    {
      "enclosure-id": "  17 ",
      "slot": "  8 ",
      "disk-size": "  558.911 GB [0x45dd2fb0 Sectors] ",
      "disk-state": "  Online, Spun Up "
    }
  ]
}
{
  "id": "6",
  "raid-type": "  Primary-0, Secondary-0, RAID Level Qualifier-0 ",
  "size": "  558.406 GB ",
  "state": "  Optimal ",
  "number-drives": "  1 ",
  "physical-disks": [
    {
      "enclosure-id": "  17 ",
      "slot": "  9 ",
      "disk-size": "  558.911 GB [0x45dd2fb0 Sectors] ",
      "disk-state": "  Online, Spun Up "
    }
  ]
}
{
  "id": "7",
  "raid-type": "  Primary-0, Secondary-0, RAID Level Qualifier-0 ",
  "size": "  558.406 GB ",
  "state": "  Optimal ",
  "number-drives": "  1 ",
  "physical-disks": [
    {
      "enclosure-id": "  17 ",
      "slot": "  10 ",
      "disk-size": "  558.911 GB [0x45dd2fb0 Sectors] ",
      "disk-state": "  Online, Spun Up "
    }
  ]
}
{
  "id": "8",
  "raid-type": "  Primary-0, Secondary-0, RAID Level Qualifier-0 ",
  "size": "  558.406 GB ",
  "state": "  Optimal ",
  "number-drives": "  1 ",
  "physical-disks": [
    {
      "enclosure-id": "  17 ",
      "slot": "  11 ",
      "disk-size": "  558.911 GB [0x45dd2fb0 Sectors] ",
      "disk-state": "  Online, Spun Up "
    }
  ]
}
{
  "id": "9",
  "raid-type": "  Primary-0, Secondary-0, RAID Level Qualifier-0 ",
  "size": "  558.281 GB ",
  "state": "  Optimal ",
  "number-drives": "  1 ",
  "physical-disks": [
    {
      "enclosure-id": "  17 ",
      "slot": "  12 ",
      "disk-size": "  558.792 GB [0x45d964b8 Sectors] ",
      "disk-state": "  Online, Spun Up "
    }
  ]
}
{
  "id": "10",
  "raid-type": "  Primary-0, Secondary-0, RAID Level Qualifier-0 ",
  "size": "  558.406 GB ",
  "state": "  Optimal ",
  "number-drives": "  1 ",
  "physical-disks": [
    {
      "enclosure-id": "  17 ",
      "slot": "  13 ",
      "disk-size": "  558.911 GB [0x45dd2fb0 Sectors] ",
      "disk-state": "  Online, Spun Up "
    }
  ]
}
And we can now see the disks presented to our proxmox host :
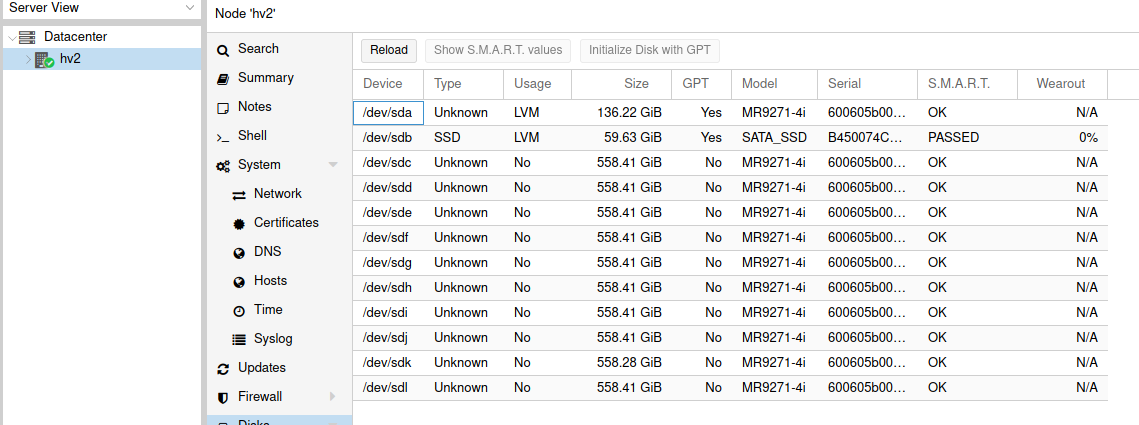
You can use the proxmox GUI to create our ZFS pool, but because I am a CLI guy let's create it with the command below:
root@hv2:~/storage/megacli# zpool create -f -o ashift=12 hv2-tucana-lab \
mirror /dev/sdb /dev/sdc \
mirror /dev/sdd /dev/sde \
mirror /dev/sdf /dev/sdg \
mirror /dev/sdh /dev/sdi \
mirror /dev/sdj /dev/sdk \
mirror /dev/sdl /dev/sdm
We have created a 5 x 2-way mirror. This setup configuration is similar to a RAID10 that offers fast IOPs since the goal is to host VMs that will benefit from such setup however we are sacrificing space that is half the total raw space avaiable.
root@hv2:~/storage/megacli# zfs list
NAME                           USED  AVAIL     REFER  MOUNTPOINT
hv2-tucana-lab                27.8G  2.60T       96K  /hv2-tucana-lab
hv2-tucana-lab/folder         2.00G  2.60T     2.00G  /hv2-tucana-lab/folder
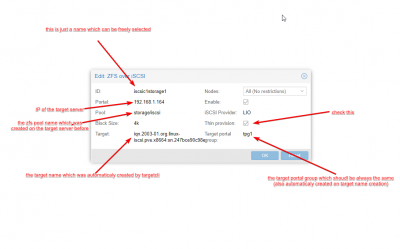
We will present the pool to our proxmox and this time using the GUI.
Navigate to Datacenter > Storage > Add > ZFS
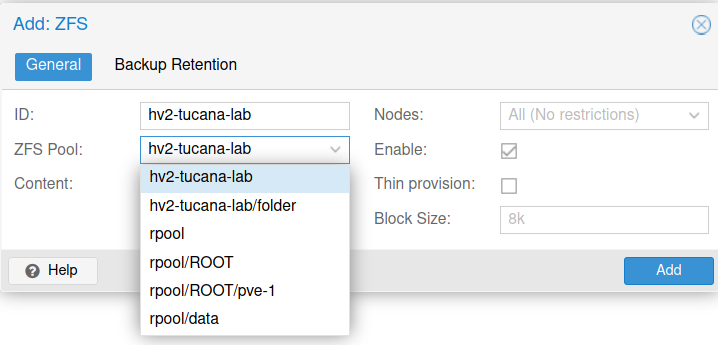
If you do no want to leave the CLI the command below will achieve the same result :
# pvesm add zfspool hv2-tucana-lab -pool hv2-tucana-labWe can now start to deploy our VMs into the newly created ZFS pool. A future article will cover how to test the IOPs and tune parameters of different types of RAIDZ to have a faster and more resilient pool.
We will also explore how to setup an SSD for cache, how to resilver our pool in case of a disk failure and set monitoring. Keep tuned for more articles.
Resources
 Name *Reply
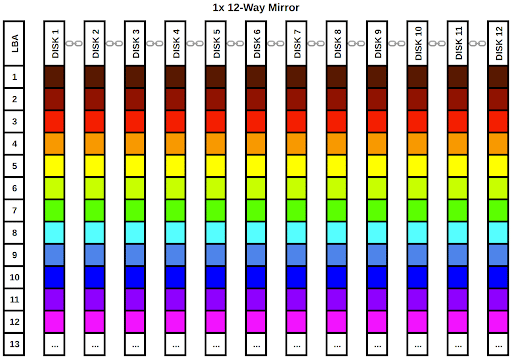 Reply
Reply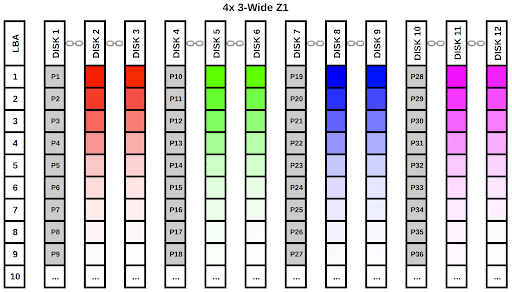


 Jim Salter