![Infoitech - [B]logging](https://blog.infoitech.co.uk/content/images/2021/04/youtube-small-cover-1.png)
Proxmox - Migrate ZFS on root from 6.4-13 to 7.x
I had manually migrated my proxmox installation from LVM to ZFS on root. Although it worked very well, I am now paying a price for not have used the proxmox installer. Basically, newer versions of proxmox requires you to use their boot tool when running ZFS on root.
Reading their documentation, it was clear that to use their tool I would need an extra small partition automatically created when installed using their installer. However, this was not my case.
To fix this issue, I will install proxmox 6.4.1 fresh in new pair of disks. After the installation, I will migrate my current data to the new ZFS pool and then configure the proxmox boot tool. This approach will avoid a complete migration of all my configs and VMs/Containers to a new proxmox install.
Table of Contents
├── 3 - Proxmox 6.4 New Installation
├── 5 - Booting From the New Installation
└── Conclusion
1) Disk Preparation
I will replace the 2x 146GB in slot 0 and slot 1 for 2x 600GB disks. These new disks will accommodate the new proxmox installation.
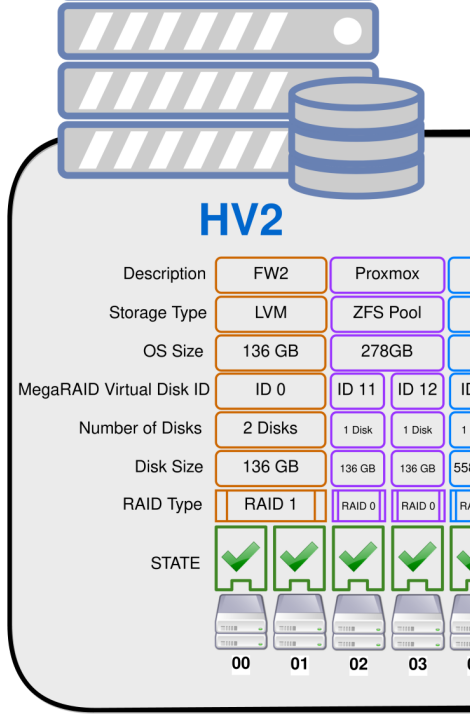
FW2 disks have been migrated to a temporary ZFS pool and for precaution a full backup of the config was performed.
The RAID 1 is ready to be deleted.
megacli -cfglddel -l0 -a0Adapter 0: Deleted Virtual Drive-0(target id-0)
Exit Code: 0x002) Update Proxmox GUI
After deleting the virtual disk, we need to update proxmox's GUI.
We will do that editing /etc/pve/storage.cfg and deleting the reference to the old virtual disk.
...

lvmthin: HV2-FW2
        thinpool HV2-FW2
        vgname HV2-FW2
        content rootdir,images
        nodes hv2

...3) Proxmox 6.4 New Installation
With the two new disks ready a fresh installation of proxmox 6.4 will be done.
The proxmox installer is quite basic and it does not show the disks serial. And, I don't want to delete my current installation by mistake.
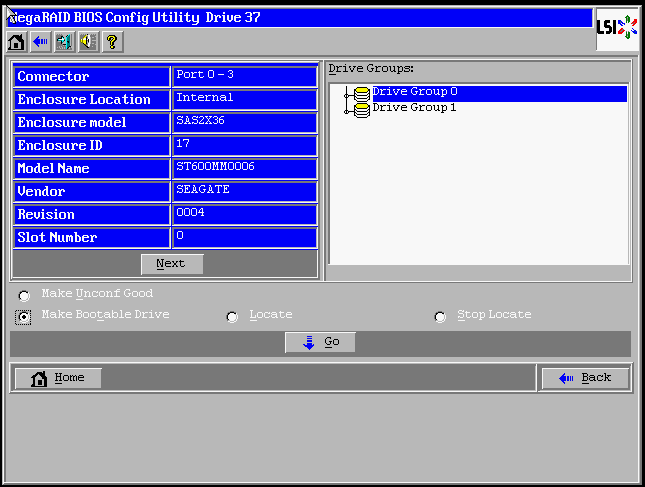
If you start the installer in debug mode. After the disks detection it is possible to use lsblk to determine how the installer mapped the disks.

{
        "slot-number": 0,
        "enclosure-id": "17",
        "enc-position": "1",
        "device-id": "37",
        "wwn": "5000C5007228FFB0",
        "media-error-count": "0",
        "other-error-count": "2",
        "predict-fail-count": "0",
        "pd-type": "SAS",
        "raw-size": 600126116593.664,
        "sector-size": "512",
        "logical-size": "512",
        "firmware-state": "JBOD",
        "serial": "SEAGATEST600MM00060004S0M2BLYE",
        "device-speed": "6.0Gb/s",
        "link-speed": "6.0Gb/s",
        "drive-temp": "30C",
        "os-path": "/dev/sdn"
      },
      {
        "slot-number": 1,
        "enclosure-id": "17",
        "enc-position": "1",
        "device-id": "48",
        "wwn": "5000C50075D25A38",
        "media-error-count": "0",
        "other-error-count": "0",
        "predict-fail-count": "0",
        "pd-type": "SAS",
        "raw-size": 600126116593.664,
        "sector-size": "512",
        "logical-size": "512",
        "firmware-state": "JBOD",
        "serial": "SEAGATEST600MM00060004S0M2JE8M",
        "device-speed": "6.0Gb/s",
        "link-speed": "6.0Gb/s",
        "drive-temp": "30C",
        "os-path": "/dev/sdx"
      }
** ATTENTION ** Be extremely careful here otherwise you can destroy your data if installing in the wrong disks.
I will proceed since I am confident that the disks to select are /dev/sdk & /dev/sdu
Once the installer loads, select Options -> Filesystem : ZFS RAID1 -> Deselect All and select the drivers that corresponds to your installation needs.
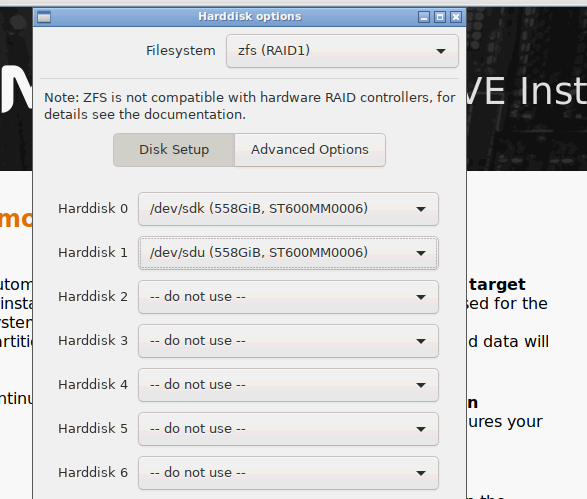
Go to Advanced Options and change the ashift to match your HDD strip size. My installation requires it to be 9. The math is 2^9 = 512.
{
"sector-size": "512",
"logical-size": "512"
}After the installation, I have booted as before from the old disks. However, for a reason beyond my knowledge the disks changed its names.
Proxmox failed to boot and I had to manually import the old ZFS pool. Because the cache file was expecting different disk names.
zpool import -N rpool_ID
exit
4) ZFS Pool Migration
It is time to migrate our old installation on top of the new one.
zpool import -N 9653296271845752370 proxmoxnewI have use the flag -N to avoid ZFS trying to mount the datasets. If you run the command zpool import with no flags it will be possible to find the pool ID. Also, a new name is needed because we already have a pool named rpool.
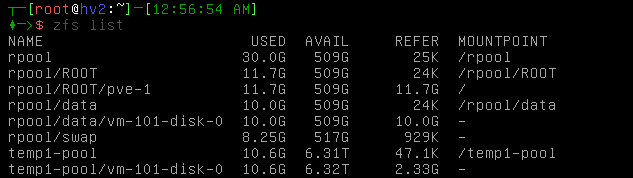
zfs listNAME USED AVAIL REFER MOUNTPOINT
proxmoxnew 928M 538G 25K /proxmoxnew
proxmoxnew/ROOT 928M 538G 24K /proxmoxnew/ROOT
proxmoxnew/ROOT/pve-1 928M 538G 928M /
proxmoxnew/data 24K 538G 24K /proxmoxnew/data
rpool 30.2G 239G 104K /rpool
rpool/ROOT 11.9G 239G 96K /rpool/ROOT
rpool/ROOT/pve-1 11.9G 239G 11.9G /
rpool/data 10.0G 239G 96K /rpool/data
rpool/data/vm-101-disk-0 10.0G 239G 10.0G -
rpool/swap 8.25G 247G 1.04M -
temp1-pool 10.6G 6.39T 47.1K /temp1-pool
temp1-pool/vm-101-disk-0 10.6G 6.39T 2.33G -
We will need a snapshot of the current pool and its datasets in order to replicate it.
zfs snap -r rpool@22-07-23_00-14zfs list -o name,avail,type,mountpoint -t all
NAME                                     AVAIL  TYPE        MOUNTPOINT
proxmoxnew                                538G  filesystem  /proxmoxnew
proxmoxnew/ROOT                           538G  filesystem  /proxmoxnew/ROOT
proxmoxnew/ROOT/pve-1                     538G  filesystem  /
proxmoxnew/data                           538G  filesystem  /proxmoxnew/data
rpool                                     239G  filesystem  /rpool
rpool@22-07-23_00-14                         -  snapshot    -
rpool/ROOT                                239G  filesystem  /rpool/ROOT
rpool/ROOT@22-07-23_00-14                    -  snapshot    -
rpool/ROOT/pve-1                          239G  filesystem  /
rpool/ROOT/pve-1@22-07-23_00-14              -  snapshot    -
rpool/data                                239G  filesystem  /rpool/data
rpool/data@22-07-23_00-14                    -  snapshot    -
rpool/data/vm-101-disk-0                  239G  volume      -
rpool/data/vm-101-disk-0@22-07-23_00-14      -  snapshot    -
rpool/swap                                247G  volume      -
rpool/swap@22-07-23_00-14                    -  snapshot    -
temp1-pool                               6.39T  filesystem  /temp1-pool
temp1-pool/vm-101-disk-0                 6.39T  volume      -
We are now ready to replicate the pool with the handy send/receive commands.
zfs send --replicate rpool@22-07-23_00-14 | pv | zfs receive -u -F proxmoxnew--replicate - Generate a replication stream package, which will replicate the specified file system, and all descendant file systems, up to the named snapshot. When received, all properties, snapshots, descendant file systems, and clones are preserved.
-u - File system that is associated with the received stream is not mounted.
-F - Force a rollback of the file system to the most recent snapshot before performing the receive operation. If receiving an incremental replication stream (for example, one generated by zfs send -R [-i|-I ]), destroy snapshots and file systems that do not exist on the sending side.
zfs list -o name,avail,type,mountpoint -t allNAME AVAIL TYPE MOUNTPOINT
proxmoxnew 509G filesystem /proxmoxnew
proxmoxnew@22-07-23_00-14 - snapshot -
proxmoxnew/ROOT 509G filesystem /proxmoxnew/ROOT
proxmoxnew/ROOT@22-07-23_00-14 - snapshot -
proxmoxnew/ROOT/pve-1 509G filesystem /
proxmoxnew/ROOT/pve-1@22-07-23_00-14 - snapshot -
proxmoxnew/data 509G filesystem /proxmoxnew/data
proxmoxnew/data@22-07-23_00-14 - snapshot -
proxmoxnew/data/vm-101-disk-0 509G volume -
proxmoxnew/data/vm-101-disk-0@22-07-23_00-14 - snapshot -
proxmoxnew/swap 517G volume -
proxmoxnew/swap@22-07-23_00-14 - snapshot -
rpool 239G filesystem /rpool
rpool@22-07-23_00-14 - snapshot -
rpool/ROOT 239G filesystem /rpool/ROOT
rpool/ROOT@22-07-23_00-14 - snapshot -
rpool/ROOT/pve-1 239G filesystem /
rpool/ROOT/pve-1@22-07-23_00-14 - snapshot -
rpool/data 239G filesystem /rpool/data
rpool/data@22-07-23_00-14 - snapshot -
rpool/data/vm-101-disk-0 239G volume -
rpool/data/vm-101-disk-0@22-07-23_00-14 - snapshot -
rpool/swap 247G volume -
rpool/swap@22-07-23_00-14 - snapshot -
temp1-pool 6.39T filesystem /temp1-pool
temp1-pool/vm-101-disk-0 6.39T volume -5) Booting From the New Installation
We need to set one the disks in the new pool as the boot device.
Proxmox initially failed to boot because we renamed the root pool to proxmoxnew and we should have exported it before rebooting the system.
Run the command below to rename the pool and forced it to be imported.
zpool import -f -N proxmoxnew rpool
exit
To avoid the the issues below. I highly recommend that you rename the old ZFS pool.
zpool import -N OLD_POOL_ID proxmoxoldAnd change the mount-point / to something else as showed below.
After, exiting the system booted perfectly into the mirrored new pool.
** ISSUE **
The only issue is that my scripts to set the network failed to load and I currently using IPMI to investigate what happened.
After an extensive investigation, I have managed to partially fix the issues with my network scripts. It had nothing to do with the scripts themselves.
Because the name of the old ZFS pool was the same as the new proxmox was failing to boot complaining of not being able to import the rpool pool.
The old pool was renamed to proxmoxold with the command:
zpool import -N POOL_ID proxmoxnewNAME USED AVAIL REFER MOUNTPOINT
proxmoxold 30.2G 239G 104K /proxmoxold
proxmoxold/ROOT 11.9G 239G 96K /proxmoxold/ROOT
proxmoxold/ROOT/pve-1 11.9G 239G 11.9G /
proxmoxold/data 10.0G 239G 96K /proxmoxold/data
proxmoxold/data/vm-101-disk-0 10.0G 239G 10.0G -
proxmoxold/swap 8.25G 247G 1.04M -
rpool 30.1G 509G 25K /rpool
rpool/ROOT 11.8G 509G 24K /rpool/ROOT
rpool/ROOT/pve-1 11.8G 509G 10.7G /
rpool/data 10.0G 509G 24K /rpool/data
rpool/data/vm-101-disk-0 10.0G 509G 10.0G -
rpool/swap 8.25G 517G 929K -
temp1-pool 10.6G 6.39T 47.1K /temp1-pool
temp1-pool/vm-101-disk-0 10.6G 6.39T 2.33G -After another manual import Proxmox booted. However, still with quite a few systemd units failing to load.
I then decided to migrate my installation to the proxmox boot tool following the documentation tutorial. It's been successful. However, this time the zpool import command complained that the pool appeared to be in use.
I have then forced the import and magically proxmox booted and all the systemd units that failed previously loaded apart from the zfs-mount.service unit file. The failure of this unit caused an error with local-zfs storage.
zpool import -f -N rpoolAnother issue that after some investigation had an relatively easy fix. The old pool was mounted to /.
zfs get mountpoint proxmoxold/ROOT/pve-1NAME PROPERTY VALUE SOURCE
proxmoxold/ROOT/pve-1 mountpoint / localI have changed the mount-point, rebooted and voila. Everything is working as expected.
zfs set mountpoint=/proxmoxold/rootdir proxmoxold/ROOT/pve-1zfs get mountpoint proxmoxold/ROOT/pve-1
NAME PROPERTY VALUE SOURCE
proxmoxold/ROOT/pve-1 mountpoint /proxmoxold/rootdir local
systemctl list-units --failed
0 loaded units listed. Pass --all to see loaded but inactive units, too.
To show all installed unit files use 'systemctl list-unit-files'.
6) Upgrading Proxmox
I will follow the proxmox upgrade guide and the first step is to use their script and determine if you are ready to migrate.
pve6to7 --full= SUMMARY =
TOTAL: 22
PASSED: 16
SKIPPED: 3
WARNINGS: 0
FAILURES: 0My system has no warnings and is ready for the upgrade.
Adjust your package repositories to reflect the below.
cat /etc/apt/sources.listdeb http://ftp.uk.debian.org/debian bullseye main contrib
deb http://ftp.uk.debian.org/debian bullseye-updates main contrib
# security updates
deb http://security.debian.org bullseye-security main contribcat /etc/apt/sources.list.d/pve-no-subscription.list# PVE pve-no-subscription repository provided by proxmox.com,
# NOT recommended for production use
# Versions up to 6.4
#deb http://download.proxmox.com/debian/pve buster pve-no-subscription
# Upgrade to 7.x
deb http://download.proxmox.com/debian/pve bullseye pve-no-subscriptionWe need to run an apt update to get the new packages.
apt update
607 packages can be upgraded. Run 'apt list --upgradable' to see them.
| Before running the upgrade command make sure to read all the know issues from 6.4 up to the latest.
| You can also take a snapshot of your ZFS pool in case you need to restore to the previous 6.4 working state.
Finally, run the command below to upgrade.
apt dist-upgradeYou are attempting to upgrade from proxmox-ve '6.4-1' to proxmox-ve '7.2-1'.
Press enter to continue, or C^c to abort.If the command exits successfully, you can reboot the system in order to use the new PVE kernel.
Conclusion
The process above described a migration of a custom ZFS on root proxmox running version 6.4 to the latest version at the time this article was written. I have learned a bit more about how ZFS and proxmox works. I hope it helps you as well.