![Infoitech - [B]logging](https://blog.infoitech.co.uk/content/images/2021/04/youtube-small-cover-1.png)
Proxmox Cluster (Tucana Cloud) - Part I

This series of articles are going to document how to create a high availability cluster in proxmox and without further ado let's start the fun.
The proxmox documentation does not recommend setting up a cluster with only two hypervisors due to issues with the quorum system however we can circunvent the issue using a raspberrypi as a Qdevice to mitigate the quorum issues as described here. We are going to discuss this setup further down the series since at the time of writing it had not been implemented yet.
Before we start you might be asking yourself : why is he not using real world hardware like switches and firewalls?
In production we should definitely be using such devices however for such set up we will need extra rack space, hypervisors and the appliances itself that unfortunately was not available and the challenge was to create the best with whatever was available to us.
Let's going to start setting up our network that will be a mix of linux virtual networking and virtual appliances as seen on the diagram below.
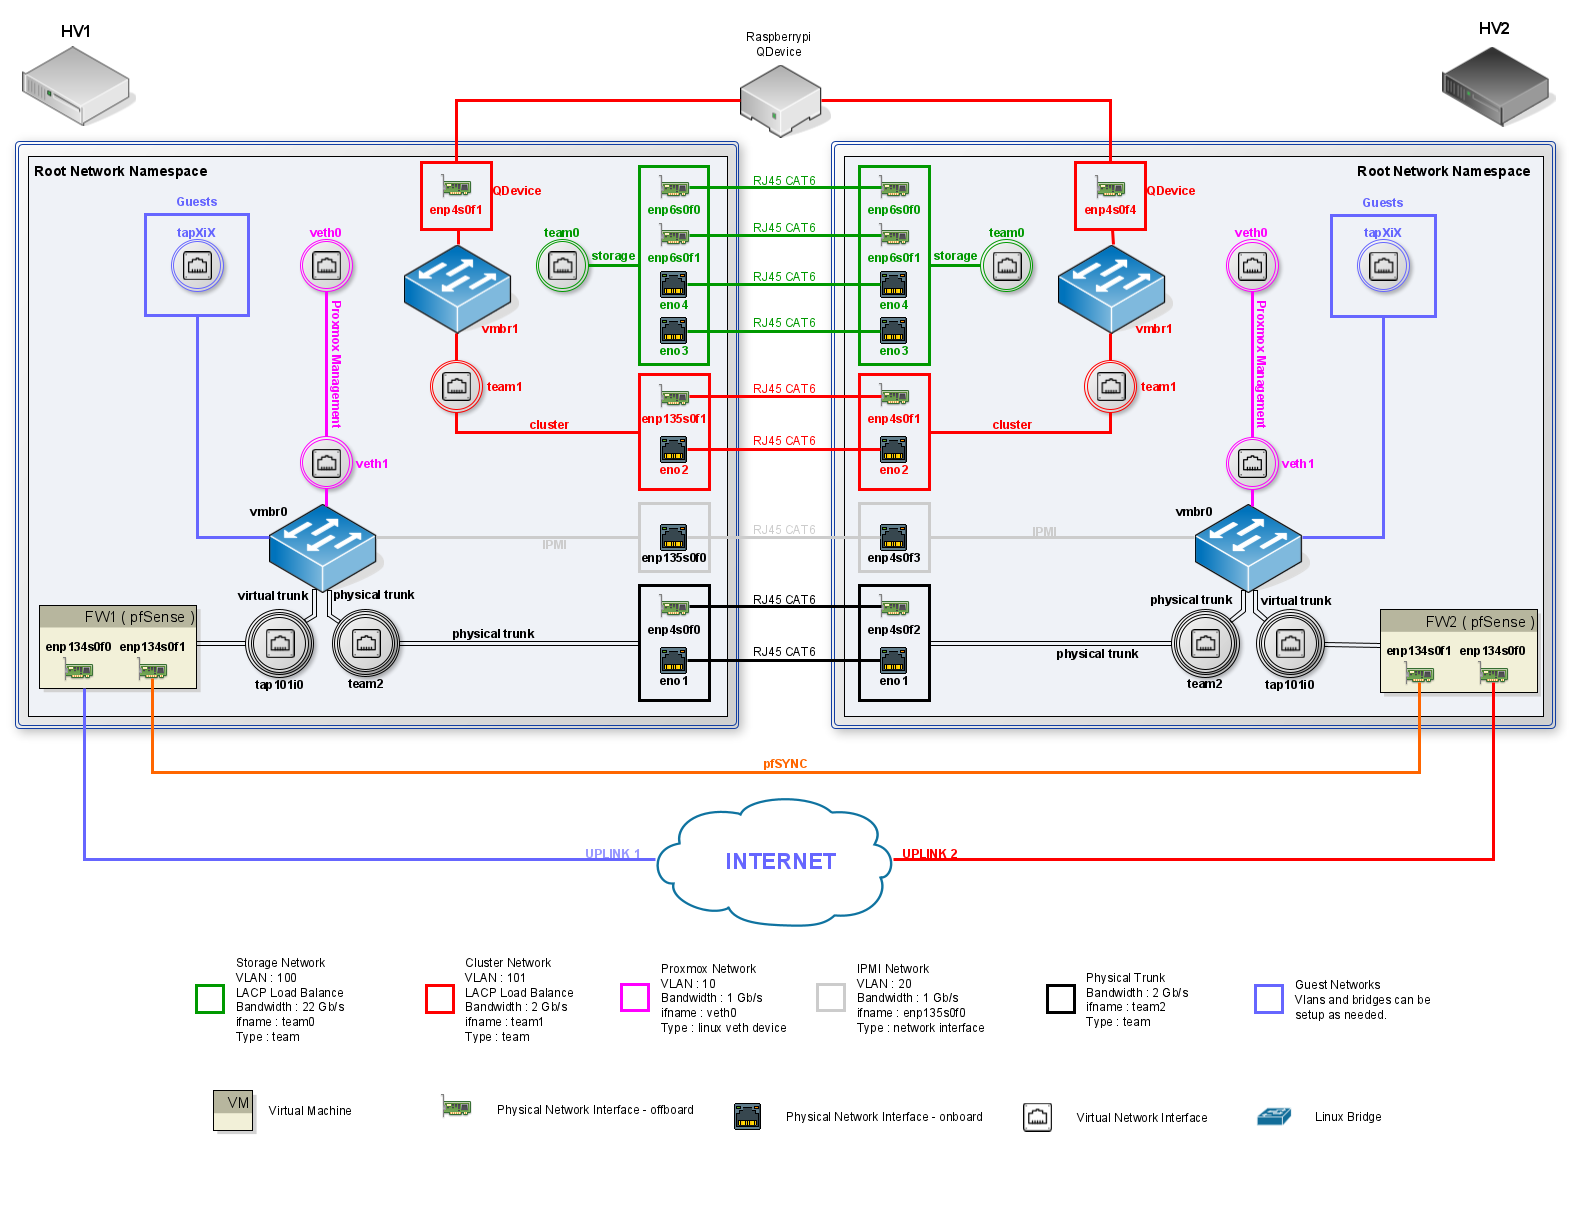
When proxmox is installed by default it is going to create a linux bridge assign it an IP address ( based on what you've set when installing ) which is going to be its management IP and the new virtual machines will be connected to this bridge. Most hosting providers do no support the above setup. For security reasons, they disable networking as soon as they detect multiple MAC addreses on a single interface.
Our first step is edit our ifupdown config file with a basic config for our bridge and interfaces :
hv1-ssh@hv1:~$ sudo vim /etc/network/interfaces###### NETWORK CONFIGURATION #####
####### LOOPBACK INTERFACE #######
auto lo
iface lo inet loopback
##################################
########### BRIDGE 0 #############
#allow-hotplug vmbr0
auto vmbr0
iface vmbr0 inet manual
bridge_ports none
bridge_stp off
bridge_fd 0
up ip link set dev vmbr0 up
##################################
###### MANAGEMENT INTERFACE ######
auto eno1
iface eno1 inet manual
##################################
###### TRUNK INTERFACE ######
auto eno2
iface eno2 inet manual
##################################
iface eno3 inet manual
iface eno4 inet manual
iface enp5s0f0 inet manual
iface enp5s0f1 inet manual
####### IPMI INTERFACE ########
auto enp135s0f0
iface enp135s0f0 inet manual
##################################
iface enp135s0f1 inet manualWe are going to be using the command ip to config our network however it brings the problem that it is not persistent on reboots. That problem is going to be addressed with some scripts running at startup and will be detailed in a future article too.
Let's make sure that our bridge is VLAN aware :
hv1-ssh@hv1:~$ ip link set vmbr0 type bridge vlan_filtering 1When a bridge is created in linux by default it has VLAN 1 assigned to it and every new interface that is added to the bridge automatically is given the same VLAN ID.
hv1-ssh@hv1:~$ bridge vlan show
port    vlan ids
vmbr1    1 PVID Egress Untagged

dummy0   1 PVID Egress Untagged
Unlike in switches that we can not delete VLAN 1 and we just create a "blackhole" VLAN to add interfaces to it, in linux we can delete VLAN 1 and it is exactly what we are going to do.
hv1-ssh@hv1:~$ sudo bridge vlan del dev dummy0 vid 1 master
hv1-ssh@hv1:~$ sudo bridge vlan del dev vmbr1 vid 1 self
hv1-ssh@hv1:~$ bridge vlan show
port    vlan ids
vmbr1   None
dummy0  None
At this point we have our host network ready and the next step is to create our firewall. The steps are detailed on the article below :
[[---Hyperlink for the article detailing the creation of the firewall-—]]
Our firewall's WAN is a passthrough of a physical interface and our LAN is a virtual interface connected to our bridge which is our trunk port to where all our traffic is going to flow. We are going to assume that our firewall's LAN is the interface dummy0 used on the previous examples. Also, let's assume that we have three VLANS configured on our firewall ( VLAN10, VLAN20 & VLAN30 ).
Let's get our firewall trunk configured using the bridge command :
hv1-ssh@hv1:~$ sudo bridge vlan add dev dummy0 vid 10 master
hv1-ssh@hv1:~$ sudo bridge vlan add dev dummy0 vid 20 master
hv1-ssh@hv1:~$ sudo bridge vlan add dev dummy0 vid 30 master
We should end up with our bridge as follows :
hv1-ssh@hv1:~$ bridge vlan show
port    vlan ids
vmbr1   None
dummy0   10
         20
         30
We are now ready to create our virtual machines and have them on the VLAN we need them to be, so let's again assume that we have created a VM and we want it to be on VLAN10 and its network interface is named vps-nic0. First, we are going to make sure it is not part of VLAN1 or any other VLAN executing the following command :
hv1-ssh@hv1:~$ sudo bridge vlan del dev vps-nic0 vid 1 master
hv1-ssh@hv1:~$ bridge vlan show dev vps-nic0
port    vlan ids
vps-nic0        None
And then, we are going to add the VLAN we want our VM to be part of that which in our example is going to be VLAN 10 :
hv1-ssh@hv1:~$ sudo bridge vlan add dev vps-nic0 vid 10 pvid untagged master
hv1-ssh@hv1:~$ bridge vlan show
port    vlan ids
vmbr1   None
dummy0   10
         20
         30

vps-nic0         10 PVID Egress Untagged
At this point we have our VM on the desired VLAN and we should be able to get an IP address from our firewall. In order to have more VMS on the same VLAN we just need to folow the steps above and change the desired VLAN or even use another VLAN based on our network topology.
Even though we have been able to get it working is very important that we understand what is happening. Let's analyse the output of the command bridge vlan show and see what is going on within our network.
hv1-ssh@hv1:~$ bridge vlan show
port    vlan ids
vmbr1   None
dummy0   10
         20
         30

vps-nic0         10 PVID Egress Untagged
vmbr0 - the bridge itself should not be part of any VLAN. We have removed it from VLAN1 to avoid any unexpected leak.
dummy0 - is our trunk port. You might have noticed that it only has the vlans we want to flow through it ( vlan10, vlan20 & vlan30 ). Having just the VID set on a port means that all traffic ingressing and egressing is going to be tagged and if untagged traffic reaches the port it is going to be dropped. That's what we expect from a trunk port.
vps-nic0 - our virtual machine interface. The VLAN tag 10 means that all traffic ingressing is going to be tagged with VLAN10. PVID is used to ensure that all untagged traffic ingressing the bridge port gets tagged with VLAN10 and finally egrees untagged remove the tag to outgoing traffic.
We conclude here and in the next article we are going to explore how the above has been scripted and automated to execute on boot and everytime a virtual machine is created.
Please leave a comment if you find issues with the setup and suggestions are very welcomed too. Thanks.
External Links :