![Infoitech - [B]logging](https://blog.infoitech.co.uk/content/images/2021/04/youtube-small-cover-1.png)
OPNsense - WAN Bridging for Public IP Addressing
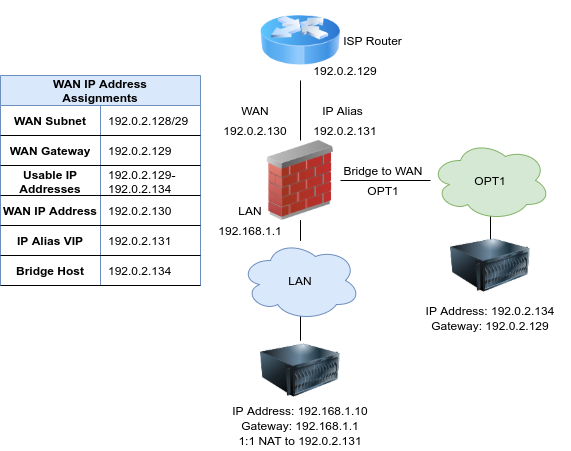
With only a single public /29 subnet available, consuming the remaining two addresses from the range is a challenge. After some research, the not ideal bridging solution is the best of the worst solution as seen in the picture below.

The diagram below from the pfSense documentation illustrates a typical bridge setup. My setup will use the pfSense example as the baseline.
1) OPNsense Configuration
Let's start with the OPNsense configuration.
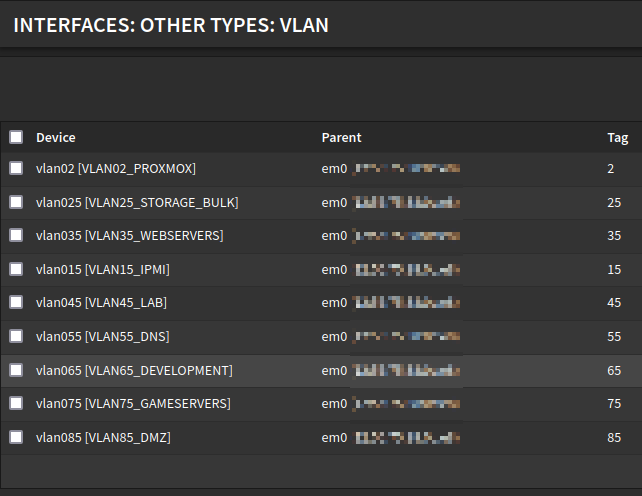
1.1) The first step is to create a VLAN or interface that reflects your setup. I have made VLAN85_DMZ, as seen in the pictures below.
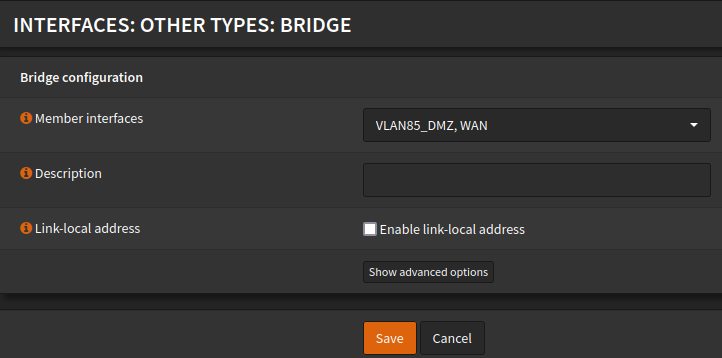
1.2) Create a bridge and add the VLAN85_DMZ (em0 subinterface 85) and WAN interface.
1.3) Navigate to Interfaces > Assignment and assign the bridge. You can edit and rename, as seen in the picture below.

1.4) System tunables need to be changed, as pointed out in this forum article and explained in this OPNsense documentation example.

1.5) Finally, we can enable the bridge to complete the firewall configuration.
2) Proxmox Configuration
The next step is to allow the newly created VLAN85 in the trunk port inside proxmox.
2.1) We can use the command below to add the VLAN85 to the trunk. It has also been added to the configuration file part of the automation to configure the network during startup.
bridge vlan add dev tap100i0 vid 85 masterbridge vlan show dev tap100i0
port vlan-id
tap100i0 2
15
25
35
45
55
65
75
852.2) Finally, the VLAN85 has to be added to the access port connected to the VM consuming the public IP address.
bridge vlan add dev tap103i0 vid 85 pvid untagged masterbridge vlan show dev tap103i0
port vlan-id
tap103i0 85 PVID Egress Untagged3) VM Configuration
The last step is to configure the VM with the public IP address.
3.1) Before setting up the public IP address, use the script below to create basic firewall rules to protect our system. The bridged setup skips your primary firewall filtering, and the system will be exposed to the internet without firewalling.
#!/bin/sh

IPT=/usr/bin/iptables

# INTERFACES ####
IFACE1=ens18

# PORTS #########
PORT_SSH=22

PORT_DNS=53
PORT_NTP=123
PORT_HTTP=80
PORT_HTTPS=443
PORT_SNMP=161

PORTS_EPHEMERAL=1024:65535

# Flush rules and delete custom chains
$IPT -F
$IPT -X

# New Chains #######################################################################################################################

    # SSH - Define chain to control SSH access.
    $IPT -N chain-incoming-ssh
    $IPT -A chain-incoming-ssh -p tcp --dport $PORT_SSH -j LOG  --log-prefix "[fw-inc-ssh] " -m limit --limit 6/min --limit-burst 4
    $IPT -A chain-incoming-ssh -i $IFACE1 -j ACCEPT -m comment --comment "SSH - any addr"
    $IPT -A chain-incoming-ssh -j DROP

    # HTTPS - Chain for webserver.
    $IPT -N chain-incoming-https
    $IPT -A chain-incoming-https -p tcp --dport $PORT_HTTPS -j LOG  --log-prefix "[fw-inc-https] " -m limit --limit 6/min --limit-burst 4
    $IPT -A chain-incoming-https -i $IFACE1 -j ACCEPT -m comment --comment "HTTPS - any addr"
    $IPT -A chain-incoming-https -j DROP

    # Chain to log and drop incoming packets #####
    $IPT -N chain-incoming-log-and-drop
    $IPT -A chain-incoming-log-and-drop -j LOG --log-prefix "[fw-inc-drop] " -m limit --limit 6/min --limit-burst 4
    $IPT -A chain-incoming-log-and-drop -j DROP

    # Chain chain to log and drop outgoing packets
    $IPT -N chain-outgoing-log-and-drop
    $IPT -A chain-outgoing-log-and-drop -j LOG --log-prefix "[fw-out-drop] " -m limit --limit 6/min --limit-burst 4
    $IPT -A chain-outgoing-log-and-drop -j DROP

####################################################################################################################################

#BLOCK - Common Attacks ############################################################################################################

    # Drop invalid packets #################
    $IPT -A INPUT -m conntrack --ctstate INVALID -j chain-incoming-log-and-drop

    #Drop spoofed packets ##################
    $IPT -A INPUT --in-interface !lo --source 127.0.0.0/8 -j DROP

    #Limit ping requests ###################
    $IPT -A INPUT -p icmp --icmp-type echo-request -m icmp --icmp-type echo-request -m limit --limit 1/second -j ACCEPT

    #Drop bogus packets ####################

    $IPT -A INPUT   -m state --state INVALID -j DROP
    $IPT -A FORWARD -m state --state INVALID -j DROP
    $IPT -A OUTPUT  -m state --state INVALID -j DROP
    $IPT -t filter -A INPUT -p tcp --tcp-flags FIN,ACK FIN -j DROP
    $IPT -t filter -A INPUT -p tcp --tcp-flags ACK,PSH PSH -j DROP
    $IPT -t filter -A INPUT -p tcp --tcp-flags ACK,URG URG -j DROP
    $IPT -t filter -A INPUT -p tcp --tcp-flags SYN,FIN SYN,FIN -j DROP
    $IPT -t filter -A INPUT -p tcp --tcp-flags SYN,RST SYN,RST -j DROP
    $IPT -t filter -A INPUT -p tcp --tcp-flags FIN,RST FIN,RST -j DROP
    $IPT -t filter -A INPUT -p tcp --tcp-flags ALL FIN,PSH,URG -j DROP

    #Block Uncommon MSS Values ############
    $IPT -t mangle -A PREROUTING -p tcp -m conntrack --ctstate NEW -m tcpmss ! --mss 536:65535 -j DROP

####################################################################################################################################

#ALLOW - loopback ##################################################################################################################

    # Accept everything on loopback ######
    $IPT -A INPUT  -i lo -j ACCEPT
    $IPT -A OUTPUT -o lo -j ACCEPT

####################################################################################################################################

#ALLOW - Established Connections ###################################################################################################

    # ACCEPT incoming packets for established connections
    $IPT -A INPUT -m conntrack --ctstate ESTABLISHED,RELATED -j ACCEPT

####################################################################################################################################

#ALLOW INCOMING ####################################################################################################################

    # Accept incoming ICMP ###############################
    $IPT -A INPUT -p icmp -j ACCEPT

    # Accept incoming HTTPS ##############################
    $IPT -A INPUT -p tcp --dport $PORT_HTTPS -j chain-incoming-https

    # Accept incoming SSH ################################
    $IPT -A INPUT -p tcp --dport $PORT_SSH -j chain-incoming-ssh

####################################################################################################################################

#ALLOW OUTGOING ####################################################################################################################

    # Accept outgoing packets for established connections
    $IPT -A OUTPUT -m conntrack --ctstate ESTABLISHED,RELATED -j ACCEPT

    # Accept outgoing DNS ###############################
    $IPT -A OUTPUT -p tcp --dport $PORT_DNS -j ACCEPT
    $IPT -A OUTPUT -p udp --dport $PORT_DNS -j ACCEPT

    # Accept outgoing NTP ###############################
    $IPT -A OUTPUT -p tcp --dport $PORT_NTP -j ACCEPT
    $IPT -A OUTPUT -p udp --dport $PORT_NTP -j ACCEPT

    # Accept outgoing HTTP/S ############################
    $IPT -A OUTPUT -p tcp --dport $PORT_HTTP  -j ACCEPT
    $IPT -A OUTPUT -p tcp --dport $PORT_HTTPS -j ACCEPT

    # Accept outgoing SSH ###############################
    $IPT -A OUTPUT -p tcp --dport $PORT_SSH  -j ACCEPT

    # Accept outgoing ICMP ##############################
    $IPT -A OUTPUT -p icmp -j ACCEPT

    # Log not accounted outgoing traffic ################
    $IPT -A OUTPUT -j chain-outgoing-log-and-drop

    # Log not accounted forwarding traffic #############
    $IPT -A FORWARD -j chain-incoming-log-and-drop

    # Drop and log INPUT traffic #######################
    $IPT -A INPUT -j chain-incoming-log-and-drop

####################################################################################################################################

# DEFAULT POLICIES #################################################################################################################

    # Drop everything else ###########################
    $IPT -P INPUT   DROP
    $IPT -P FORWARD DROP
    $IPT -P OUTPUT  DROP

####################################################################################################################################

# PERSISTENT CHANGES ###############################################################################################################
    iptables-save -f /etc/iptables/iptables.rules
3.2) Use the IP command to assign the IP to the external bridged interface.
ip addr add 1.2.3.4/29 dev ens183.3) Set the default route to your ISP's gateway, and you should be online.
ip route add default via 1.2.3.1Conclusion
The poor's man setup is not ideal therefore, not recommended. It brings some critical drawbacks, such as maintaining two firewalls, configuration complexity that can lead to mistakes, and systems with zero trust not segregated from the internal network.
Resources
OPNsense - Bridge Documentation
OPNsense - Transparent Bridge Example